The Winburn Channeled Hex Tile
Tool
by
David A Harbour
Special Note:
This article is about making a large grinding tool
whose working surface (grinding face) is made to match an already
existing curve for a mirror that has already been curve
generated, or for any blank already completely or partly roughed in, but for
which one needs a new grinding tool.The tool described herein is particularly
taylored for this kind of work, i.e., re-grinding or finishing grinding a mirror
already curve generated or roughed in, or even fine ground, but needs to be
re-ground for whatever reason.
While it is possible to build this kind of tool
this way to start from flat with a flat blank, to rough it in from flat, there
are certain risks attending making a tool this way and using it for a flat blank
that require taking extra precautions. So for those of you interested in
starting from flat with a channeled Winburn hex tool, which is the only kind of
tool I ever use, whether starting from flat, or working an existing curve, I can
describe a safer and easier to build tool to start working a flat blank that has
all of the advantages of the channelled Winburn hex tile grinding face, but
which is safer to use for starting from flat. That having been made clear, here,
right up front, let's make a big tool to curve
with Winburn hex tiles-
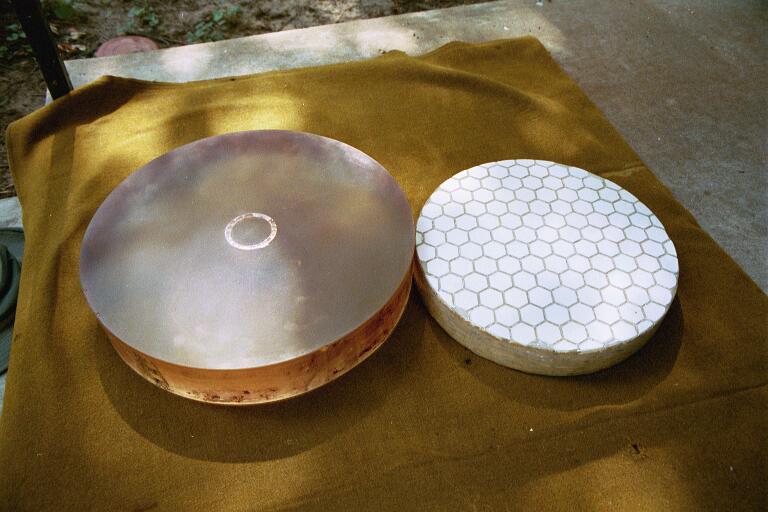
We will start this little treatise with a picture
of a completed and thoroughly used 13.1" diameter tool and the mirror it was
used to regrind:
The mirror is a full thickness 16" diameter pyrex,
cast by Corning in the thirties. The mirror and tool are still in existence,
right here in Enid, and are available for about $300, I think. The mirror is
ground to about f/4.71. The tool could be easily resurfaced and the f/ratio
changed. The mirror is very heavy.
Materials Needed For Project:
(1): Several squares of Winburn 1"
cushion edge hex tiles. Winburn cushion edge hex tiles are ideal
design for grinding, are the ones that Willman Bell says are especially made for
mirror grinding tools (not true: they are floor tiles). They are manufactured in
Little Rock, Arkansas. Ask your local tile dealer if he can get some for you. Do
not order the two inch diameter tiles, but the one inch diameter tiles. There is
a very good reason for this, which I will tell you later.
(2): Some one quarter inch thick plywood (or
masonite, or chipboard) sufficiently sized to make two "O" rings, "lifesavers",
whose inside diameter is the size of the tool you desire to make.
(3): Small wheelbarrow (to mix sand and portland
cement in). And bullet nosed shovel, and hoe, to mix cement and
sand with.
(4): One sack of Portland cement (do not buy a sack
of already mixed "Quickrete" or "Sackrete"; you do not want gravel in the mix,
only sand and Portland cement).
(5): One sheet of "Crescent" illustration board,
any color, and sharp number 11 hobby knife to cut it with.
(6): One roll of the wide, clear type shipping tape
preferred by the UPS people.
(7): One or two boxes of large kitchen
matches.
(8): One pair of toenail
clippers.
(9): Several large, black plastic trash bags, 30 or
33 gallon size (or 39 gallon size).
(10): Handfull of good sized candles (or equivelant
volume of ordinary wax). This, for later, to wax the channels.
(11): Something to serve as a large ladle to ladle
the cement/sand mix into the mold with the tiles spread onto the mirror- a
gardener's little hand spade, or a big, steel serving spoon, or a large
brickmason's trowell- whatever will work that is smaller than a
shovel.
(12): Old fashioned little hand glass cutter, and a
pair of tile nippers.
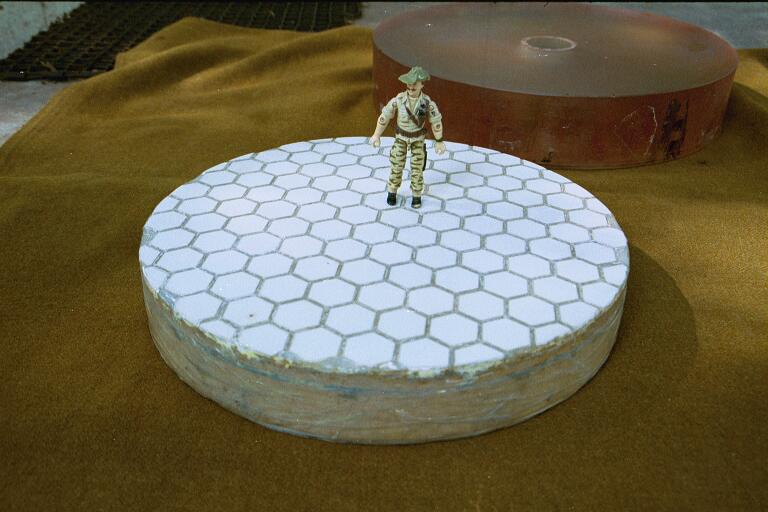
Here is a nice general view of the finished tool,
with Sergeant Etienne standing atop it, surveying his work.
Building the Tool
Make the two plywood "O" rings that will serve as
structural supports for the illustration board coffer dam first. For mirrors
below 14.25" aperture, we are going to build a tool with a one sixth thickness
ratio. Actually, for tools for 12.5" and 13.1" in diameter, I think I made them
just a little bit thicker. If you are making a full sized tool, you will need to
make the inside of these two rings of plywood the same diameter as the mirror.
The coffer dam will be a sealed band of illustration board secured inside of
this double ring of plywood. The rings can be about two and a half to three or
so inches wide all along their circumference. Space them apart by a little less
than the intended thickness of the tool, with little struts- make the little
struts out of little squares of wood, each with another little square of
wood glued to it at a right angle, so that it will stand up when you glue it
into place on one of the rings. Make about six or eight of these and glue
them in place on one of the plywood rings, and then glue the other plywood ring
on top of this one. Use something resembling a try-square when you glue the
top ring onto the little struts, holding it inside and moving it around to make
sure that the two rings are truly one above and one below each other, i.e., are
well aligned, before the glue begins to take a tack, and then weight the top
ring down.You will have a double ring of plywood ready to hold the coffer dam
perfectly circular that you are going to fix in place inside this double hoop.
Make the coffer dam next by calculating the
circumference of your mirror (diameter of mirror times 3.1415927). If you are
building a full sized tool, the width (heighth, actually) will be the thickness
of the tool plus the thickness of the mirror, as when everything is in place for
the pour, the coffer dam will extend down around the mirror to the table's
surface. If you are pouring a subdiameter tool onto the front of a larger
mirror, the heighth of the coffer damn need only be the intended thickness of
the tool. Cut out the strip of illustration board to form into the coffer dam
with a number 11 hobby knife. Use a good straight edge.
Seal the coffer dam with overlapping strips of UPS
type clear shipping tape.
Prepare Tiles & Their
Spacers
Now you need to remove a lot of the little one inch
diameter Winburn hex tiles from their paper backing. Do not under any
circumstances use fire to burn them off. One of my friends could not understand
why his tiles kept flaking off of his tool, ruining his work. I couldn't figure
it out either until he told me that he burned the paper backing off with a
torch! Throw the squares into a water soak, and then scrape the remaining paper
off of them with a knife.
Next, prepare the match stick
spacers for the tiles. Prepare them this way: measure one of the
sides of one of the hex tiles. Then, mark a whole bunch of your kitchen matches
to this length, and then, using the toenail clippers, cut a bunch of kitchen
matches to length. Dispose of the igniteable heads properly. I know this is
tedious work. That is why we are mirror makers: we thrive on
tedious perfection seeking!
We're ready to build the tool now.
Open up two large plastic trash bags. They must be
black (just kidding: for some reason I always used black ones!) and lay them out
on the work surface, and place the mirror, face up, on the trash bags. These
trash bags will be tied up over the poured tool/mirror sandwich to keep moisture
in for the cure for the cement after the tool has been poured. Okay!!!
Pay very close attention to instructions from here on out to avoid
unnecessary disaster!
You have the mirror, face up, on the double or
triple layer of heavy duty trash bags. You must not neglect to put
these trash bags under the mirror. Now, cut out another piece of
trash bag into a circular shape, about ten or fifteen percent larger than the
mirror, in a circular shape. Wet the mirror's face thoroughly, and press this
piece of trash bag onto the wet face of the mirror, and squeegie, to the best of
your ability, as many of the air bubbles and creases out from between the
mirror's wet face and this skin of plastic on it- squeegie them all the way to
the edge and out. You will not be able to get a perfect fit of plastic against
the mirror's face- this is okay. Secure the edges of the plastic that is now
covering the mirror's face down around the sides of the mirror.
Now, if you are working a large mirror and are
building a subdiameter tool, just place the double O ring hoops structure on the
mirror's plastic covered face, centered, with its sealed illustration board
coffer dam in place. If you are working a mirror that you are making a full
sized tool for, make sure to fix the coffer dam inside in place in the double
hoops, so that they will not slide down around the coffer dam.
The rationale of the hoop assembly is to hold the
cement/sand mix perfectly circular, with nice, smooth, straight up and down
sides while the mix cures. Okay!!!
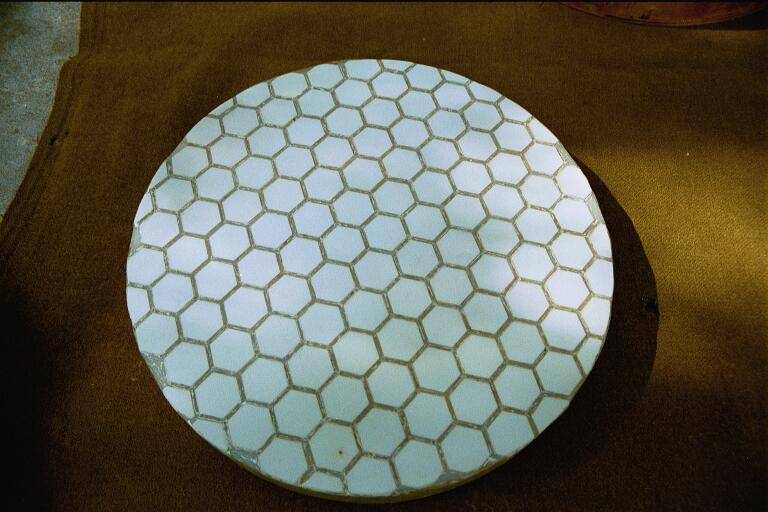
Start laying tiles on the face of the mirror,
placing your little pre-cut to length matchstick spacers between
every side of each adjacent tile. You will finally fill
in the area up to the edges; try to nip partial tiles down to as nearly the
proper shape to fill in these partial spaces as you can. It is not necessary to
slavishly carry this to extremes- look at the pictures, see where I left some
gaps near the rim. Is not critical.
The matchstick spacers are of the ideal
dimensions for both holding the tiles in place, but leaving enough
room above the cement/sand mix for channels, and for providing the
ideal width for the channels- about three thirty
secondths of an inch (more than a sixteenth, but less than an eighth of an inch
wide). Your tool will have a silky smooth, "dreamy", ball bearing action, I
guarantee you! And it will eat glass like crazy! It will never seize
to the mirror, either! You will never make and use another kind of
tool for large glass, I promise. Now, finish the edge gaps that you did not fill
in with a partial tile with little wads of aluminum foil about the thickness of
the tiles. This way the cement mix will come out to the same heighth all over,
even if there is not a tile in place where you have left some small partial
areas without nipped down tiles, near the edge. Later, these areas will be
filled in with wax. Look at pictures, above.
Ready for the Pour!
Follow instructions to the letter from
here on out! Mix your Portland Cement and sand in about one to two,
or one to three ratio (one part Portland to about two, or three parts
sand)- try to get "mason's sand"- but any kind of sand will do- if you have
irregular sand, screen out the large grains, they will be trouble. Sift the sand
beforehand through a screen. Mason's sand is usually pre-sifted and more uniform
in size. Don't mix your "mud" too wet; use a gardener's hoe and use a variety of
motions to get it throroughly mixed, adding water a little at a time,
incrementally. Do the "shake test" to see if it is beginning to be the right
consistency; don't make it too wet, but do not mix it too dry, either- it needs
to pack down into the shallow spaces left by the matchstick spacers between the
tiles. Now, your "mud" (Portland/sand mix) is ready to fill into your assembled
mold with the tiles spaced out across your plastic liner on the mirror's
surface. This next instruction is critical; keep it clearly in
mind!!
You are ready to ladle in, very
carefully and gently with your small ladle, trowell, whatever, the
first layer of mix across the tiles all spaced out across the mirror. You have
to be gentle, and do it cautiously and slowly, or a slug of mud, just thrown in,
will tilt some tiles up and out of place into the mix!!
Don't let this happen!
After your first layer is ladled in, fill in more
rapidly to the top of the rim of the coffer dam, and then "screed off" the top,
so that this surface, which will become the bottom of the tool, will come out
pretty flat. Now, this next is important: fold up a small kitchen towel, and get
it soaking wet, and only partially wring it out. It
should be pretty wet, but not dripping, "wringing" wet. Lay this folded towel
gently across the top of the mix. Then, fold up the sides of the large plastic
wrap the mirror is lying on up around the whole filled up tool/mold/mirror
assembly, and carefully secure it up around the top, gently, so as not to push
the towel down into the back of the mix. The wet towel is to keep the air inside
very humid for the cure.
Let this assembly cure for a minimum of
four days! Five or six days is perhaps even better. We want a
thorough cure!
After the cure, unwrap the whole mess. You will
have a nicely made tool ready to slide off. Only once did I have a little
trouble getting the sandwich to come apart, and that was with my very largest
tool, a full sized 14.25" If you have trouble it getting apart (you shouldn't)
call me or email me. Don't take drastic, dangerous action. I got mine apart,
I'll tell you how I did it, if you have trouble (I made a lot of these- I only
had trouble once).
After getting the tool free from the mirror, peel
off the plastic and pry out the little spacers and aluminum stuffings near the
edges. Your #11 hobby knife's pointed blade will neatly spear the little
matchstick spacers to lift them out. Next, take a little matchstick or other
small tool, and gently scrape out little pieces of sand and mix that are
standing alone, like in the vertices of where the hexes meet, where there will
be little "peaks" of sand where the matchsticks did not quite meet. Please, if
some of you would, take close-up pictures before you pry out the little
matchstick spacers, and right after, showing the appearances of the tool up
close at these stages. I lost my pictures of these steps.
Brush all loose sand away from the sides, back, and
in between the tiles.
Seal the Tool
Get your roll of UPS style packing, shipping tape,
the clear wide kind, and wrap the mirror's back with a minimum of three layers,
preferably four, of this tape, bringing the tape up along the sides of the tool
as far as it will go. Alternate the parallel overlapping rows of layers tape at
about thirty or sixty degrees to each other. Then, seal the sides of the tool
with three or four layers, wrapped around circumferentially, on top of the other
ones that came around from the back side. This side seal should come up to the
level of the tiles, making an approximately one fifth of one inch high dam at
the edge.
Wax the Tool's Face
Melt a bunch of wax, pour it all across the face of
the tool, filling in the channels and the empty spaces near the perimeter
completely. I know- you want to know, what is the use of channels, if we are
just going to fill them in? Just bear with me and you will see. The wax in the
channels, which will be slightly excavated later to just slightly below tile
level, serves four vitally important, separate
purposes.
Next, after the mess has cooled, do the tedious
donkey work of scraping off all of the thick excess coat of wax off of the face
of the tool- yes, long, tedious work. We are mirror makers, remember?
Slaves to Pyrex and grit!
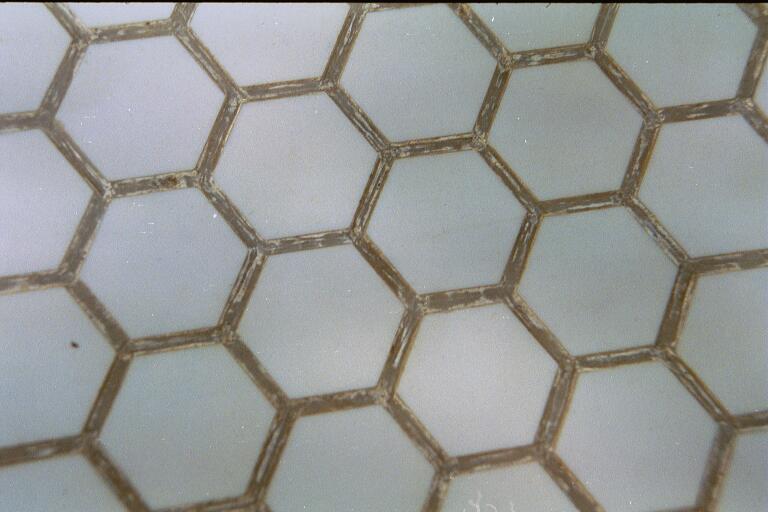
In this picture, above, we see a close-up of the
tiles, with their waxed channels grey from a coating of dried carbo sludge. You
can see that the level of the wax has been reduced to slightly below the level
of the one inch tiles.
Now, we are going to excavate,
with a small screwdriver, a little bit of the wax out of the
channels- not very much; just enough to form shallow
channels. Scrape off a layer about one thirty secondth of an inch
deep, to just below the level of the edge of the tiles on either side of the wax
filled channel. If the channels are too deep, they will just swallow and wash
away grit when the mirror is on top. And even if you are working subdiameter
only, with the tool only on top, you still need to wax and excavate just like
those working with the mirror on top sometimes, too.
Your tool must be waxed exactly as I
have instructed you to do.
A well made tool is a work of art in and of itself.
Form follows function.
Lastly, before breaking in your new tool, you must
bevel its edge. Do this exactly as you would bevel the edge of your mirror. Many
amateurs use a wrong technique when holding the whetstone- many published atm
books show this wrong technique. While it is true that you want to bevel the
edge of both tool and mirror at a forty five degree angle, you do
not want the stroke of the tool to cross the edge at a 45 deg.
angle. That is to say, although you will hold the surface of the whetstone at a
45 degree angle to the mirror's edge (and the tool when you do it), you will
want to make the direction of the stroke along the edge nearly
tangent to the edge, instead of straight down across
it. Stroking the stone straight down with direction of travel
at a right angle to the edge of the mirror or tool can take a large chip or
chips off of the edge of it. Don't do that. Now
your newly made, sealed and waxed tool is ready to break in. I am going to make
the instructions for breaking in your new tool and using it another little
treatise.
Feel free to contact me via email with any questions about this.
Thank you for letting me serve
you-
David